CONTACT

Tuesday, March 25, 2014

Saving a Kitchen Island


Saved from the trash! This piece had certainly seen it's better days. After sitting outside through various types of weather conditions wearing down on it, it really needed some TLC (or a lot!). I of all people know how important a little extra space is but, in some rare cases .. smaller can be better. I wanted to add extra storage but still keeping size in mind. Once I had the vision I was ready to begin and started taking this rescued treasure apart piece by piece.

I'm not a big fan of the whole drop leaf thing, what could I say... it was ugly! When not in use it's left just hanging there so ... this HAD to go!


It needed a vigorous sanding with all the stains and obvious wear marks. Then I did a coat of primer.


After It was taken apart and sanded down it had a lot of holes that needed to be filled. With some Spackle and wood glue and hours later it was dry and ready for another session of sanding!


I went through my scrap pile and pulled out two pieces of wood that would serve as shelving for the island. I didn't want to put a big shelf in the center since I believed it would jeopardize the space that could be used for storing larger kitchen items.
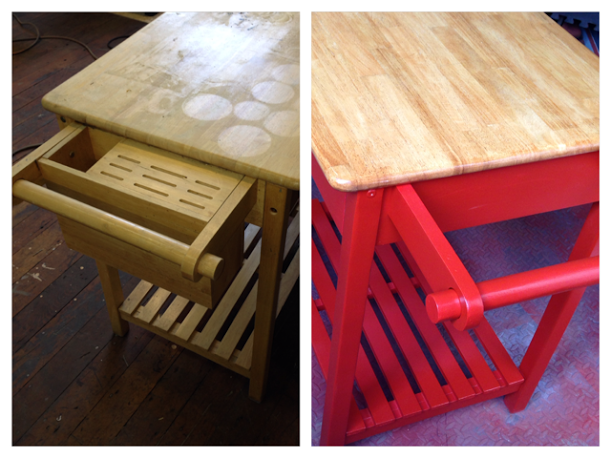
 

I decided that I wanted to completely remove the knife holding station that contained a cubby, which in my opinion was good at storing mostly dust! My reasoning, safety hazard! I was pretty uncomfortable with knives left out in the middle of the kitchen. The customer that purchased this piece has a couple young children so this ended up being a very wise choice! I did replace the towel rack since there is always good use for one of those!


I also made the decision (after already priming) to sand the top down smooth to show the beautiful butcher block wood. I was originally going to paint it another color (again I was trying to add MORE color... I just can't stop) BUT it just makes sense to leave the top original and the end result was pretty stunning! I did give myself more work since I sanded the top, primed it, and then had to sand it again but it was well worth the extra time. I used two coats of stain and always wanting superior durability I went for the third and final coat.


After all was said and done this was the final result which I was thrilled with.. (Oh and this is minus the wheels which will be added tomorrow)...


Thursday, March 20, 2014

Chevron Bench

 
This piece is proof that one man's trash is another man's treasure! Thanks to my ex-neighbors who got rid of so many great pieces! The bones of this bench were in such great shape, minus the marker stains and carvings. I loved that this project was on such a smaller scale than the last few I have done so I was excited to start! In need a of a good sanding I removed the stains and any imperfections (I love the smell of cedar!). After sanding I used some wood glue on the crack in the top and sealed it up well. After letting that dry I wiped the bench down and gave it a few coats of some black paint ( I went more neutral than I usually do). I was originally going to sew a square cushion to fit the top but then decided I wanted to completely wrap the top in fabric. Using foam, batting and then the chevron fabric this bench ended up being pretty cozy! It measures in at 31"W x 17 3/4"H x 20 1/2D. It has plenty of space underneath to slide in some big baskets for storage. 


Thursday, March 13, 2014

Spining Fabric Display

Extending a special Thank you to Kens Carpetland (in Springfield, MA) for this sweet addition to my studio.  For those of you who have a collection of fabric like I do, well this spinning beauty is such a great way to organize any upholstery room. I am now able to just spin this display around and choose what fabric inspires me versus digging through tote after tote! When organizing this display I found fabric I had no idea that I even had! Check with business that are remodeling or going out of business for great finds such as this!

Monday, March 3, 2014

Going Vintage


So after weeks and weeks of work this 1930's Secretary Desk is finally done and available for purchase! Jumping into this project it never dawned on me how much work this was going to be. Not that it would have changed my mind or anything ...! I am so glad to finally see the finished product and I am thrilled with how it came out. It was exactly as I had envisioned it in my head. I love to see how my projects come out compared to my first vision. The best part about this piece is that it can be used in so many rooms for so many different uses! Of course my first though was a kitchen or dining room for items such as ... well, wine of course! But it would also work wonders for a bedroom as a wardrobe closet. I can honestly see this piece in a baby's room. It has a plethora of shelving for diapers, wipes, pacifiers, clothes, and all the other items you need to store. But it would be the perfect fairly tale piece. in any room. 


Tuesday, February 4, 2014

Fairy Tale Furniture - 1930's Secretary Desk

Happy snow storm! I mean, Oh Darn! Haha! As the snow moves in I finally get to sit and take a break. Well sorta, I still have a boyfriend and needy cat that require my attention. I believe a snow storm serves a reminder that we all need to just sit back and relax once and a while. Mother nature is now granting us, (hmmm, some of us.. sorry folks) a day of TLC. So I decided to catch you up on this exhausting but yet unique piece I have been working on. It's a 1930's Secretary's Desk. When I first laid my eyes on it I thought ... "Did this just appear from a fairly tale?" I swear it was something Cinderella would use to store her belongings. Mermaid Skeleton key and all! So, I had to have it. Boy oh boy I didn't realize the work I had coming to me! It didn't look like it was in such bad shape but it need more TLC than I thought. Here take a look for yourself...


Beauty right!? Well, there were layers and layers of paint and poly on this beauty and oh yeah dust and grime! Piece by piece I took this Secretary's desk apart. Shelves came out, doors came off, and hardware was stripped. It took hours with a belt sander and my little mouse (for cramped areas, or corners). Most pieces just need a good wipe down but there was way too much dust left on this desk. So instead I took my hand held vacuum and cleaned the dust and dirt that covered the desk.


 There were a few spots that needed some repair before I could attempt to go further and paint. So I took out the wood glue and clamps and patched up the cracks and crevices to restore the former glory. With all the spots that needed fixing I had to let it sit and dry overnight just to sand down the spots AGAIN the next day.


Then I finally got to paint! YAHOOOOO! I wanted to create a vintage distressed look since it fit the piece so.  I first used a primer and then I chose a sky blue (which I wanted to show as the base color)and over that a nice light grey. The inside I decided to keep all blue for a simple but yet elegant look. This is where painters tape came in.


Since this piece was so old I wasn't able to get all new hardware. But it also wasn't in bad shape. I scraped off some of the old paint and (Thank You Nicole Curtis!!!!!) used an old crock pot to remove the rest of it. I used a little metallic spray paint to restore a new look to the hardware. So now as I put the shelves back in, doors back on, and hardware screw on I only had one last step left... distressing the outside. This process actually sounds pretty simple but it was a lot of hard work and a lot of time. I had to allow ample drying time after every coat that I had applied. So after this snow storm passes and all the snow melts... ha ha OK well I guess when its cleared up... I will get back to the studio and finish the most exciting part of this whole project! Check back to see the final piece all done and looking beautiful again!

Wednesday, January 29, 2014

Rainy Day Collection


You never know when you might want/need a new piece to work on! You don't need to collect a pile like myself, but having a few extra pieces lying around just might come in handy on the next rainy day! And what can I say...  I like to have options. I keep my stock pile of junk as full as possible. I'm sure there are a lot of junk lovers out there like myself. You travel to all outlets to get your FREE and Cheap junk. My love of junk started when I was just a youngin and has prospered into my now business, UNUSUAL FIT. I have this ability to look at something and see beyond what sits in front of me to what it could be. People don't always realize the potential in a dusty, broken down, tarnished piece of furniture. They don't see how you can transform a piece of junk into a masterpiece. You need to learn how to look beyond the junk that’s sitting in front of you and try to envision the striking potential that lies within your reach. If it helps you write out a list of questions to ask yourself as you gaze at a specific piece. My list is in my head and yours will be too the longer you do this!

When Repurposing I think in terms of:

BONES: Was it built well? Does it only need a few minor adjustments? Will it be sturdy enough for use when your done? If so, it's worth working with and will be a fast rainy day fix.

- COLOR: I start here because in many cases all a piece really needs is a fresh coat of paint! If it helps have some paint samples or fabric swatches nearby to hold up to the piece. You can get both paint samples and fabric swatches FREE most of the time.

HARDWARE: Swapping out the hardware can not only lead to a functional piece but it also contributes to overall appearances and the certain style you are looking for. You can get cheap pieces at flea markets, tag sales, etc. Even if you go new, Home Depot has some pretty decent prices. I am always on the look out for hardware no matter where I go.You can transform what seems at first glance to be, junk... into unique, functional pieces! Here is a before and after of what new hardware did for this nightstand.

Try this out and see how it works for you. Try to consider these few tips and you can transform your junk pile into personalized treasures, or snag that piece you just drove by at a tag sale or sitting on the side of the road.

Sunday, January 26, 2014

Flea Market Finds


When I saw these beauties my eyes widen with excitment! Older pieces have such enchanting detail! I have recently redesigned my bedroom and went for a vintage look with modern accents. These  would be the perfect final touch AND they didn't take much work at all! Just a little cleaning and spray painting! But the difference after a good 2 full coats of RUST-oleum's Seaside ...


These two pieces serve as proof how just a little bit of color can transform a look completely.