CONTACT

Wednesday, January 22, 2014

Cottage Chic meets Romantic Modern


Hmmmm, where to start on this piece. This piece really was done on a whim. A friend was looking for a piece for her newborn baby’s room and this was the piece I pulled out of my junk pile! It has perfect little baskets that go with it for storing items such as diapers and wipes. Each basket fits perfectly into each solid colored cubby. I am sharing this because I think the scrapbook backing was such a great addition to this piece and is a great idea to add to any piece for character. (Inside Drawers, on top of tables, back of shelves!)
Anyway, to get started I needed to sand away what I am sure were years of dust and grime. I gave it a good wipe down and then primed it. While it dried I took out my tools and started to measure where I wanted the separate cubbies to go (making sure each basket fit into its place). I used 1x2 scrap wood left sitting around my workshop. Carefully measuring the heights of each shelf ... remember measure twice, cut once... using my jigsaw I made the quick cut. Then I added a little wood glue to the end of each piece and put it in place. You may need a rubber pallet to tap the wood into place. These pieces had to dry before going any further since I did not want to shift them.
  
 
After everything was completely dry I started painting the outside (black) and then inside (violet). All the cutting was hand painted, no tape was used. I feel as if taping takes more time for certain projects than just slowly cutting each edge. For the decorative cubbies I used scrapbook paper. This part was the most time consuming for this project. Again, carefully measuring the cubby and then cutting the paper to fit. I used mod podge on the back of the paper and an old credit card to slowly adhere the paper to the shelf, gently smoothing air bubbles. I added a little mod podge to the front of the paper as well and then again ran the credit card over the paper. It really smoothed it out and made the paper really bend into each crevice and bump on the bookshelf. Mod Podge dries clear so there’s no worries about discoloration.


After letting everything completely dry I then took a water based Polycrylic protective finish and brushed it over the entire bookshelf. I recommend this step not only on this piece but ANY piece that you expect a great deal of use to.

Friday, January 17, 2014

Table turned Bench

Who says you can't sit on tables! Ok folks it's time to break the rules! If you were one of those mischievous children constantly getting in trouble for something like myself, (hey I couldn't help it if I got adventurous) then it's time to be a little rebellious! This table turned bench was a perfect fit for my low to the floor windows. I like to spend warm nights reading ... HGTV magazine of course or watching summer thunderstorms pass through. The bench gave me comfort, room, and it didn't block my low windows. Oh and additionally I found out this is a perfect pet bed! My cat soon took it over and spent her days sprawled out sunbathing and then at night sticking her head out to reach the warm breeze.
This project was fairly easy and the best part … the table was FREE (from the side of the road... I Love trash day). There was however a crack down the center of the top. Nothing a little wood glue can't fix. I used painters tape underneath the table so when I poured the wood glue in the crack it wouldn't leak through and end up on the floor. After it was taped I had to use several applications of wood glue to completely fill the crack. After it dried overnight I took out the sander. I sanded just the sides and the legs since the top would be covered. After it was sanded I used BEHR paint and primer in one to paint the sides and legs. After the paint was all dry I was ready to officially transform this baby! I used 4" foam for the top. I liked the look the thicker foam gave the table, it made it look more bench like and not to mention... more comfort! I used some spray adhesive (on the table top) to attach the foam to the table so it wouldn't slide around. I sprawled the measured fabric on the ground, centered the foam on top of it and slowly lowered the top of the table down to foam(table will be upside down at this point). Then I took out my staple gun and stapled the fabric to the table. While it’s flipped over this would be a good time to check all the hardware. Tighten any screws and nuts as tight as you can (you DO NOT want any wobbly legs).  Then I flipped it back over and ...


As you can see here I couldn't make up my mind on the fabric. I switched it out twice before I decided Green it was! I'll find a few throw pillows and toss then on top for some accents (Iget picky here). I placed some big baskets under the bench for storage (not the ones shown in the top picture.. I went MUCH larger). If you have the space to work with... use it to it's max! I'm looking for a much smaller table now to put in my kitchen in hopes that people may use it to take their shoes off when entering my home. This would soley benefit myself... I feel like I spend forever cleaning the floors! Hope to see some of your tables turned benches!!

Thursday, January 9, 2014

Old Window Chalkboard


Happy New Year everyone! Another year has flown by and it's time once again to make those New year resolutions. Gosh... where to start!? So, as the new year rolls in we all have to pick and choose which new years resolutions are something worth sticking too.

Well, like many of you I made more than one (probaly becasue I'll only stick to one). So the organizing freak that I am decided that this window chalkboard would be a creative way to spruce up my office but also remind me (daily) that I have set goals for myslef and I must stick with them. And for those of you smart people who have choosen to NOT make resolutions.. smart But this is still a great project for you!

I found this old window for FREE on craigslist......
 Displaying photo.JPG

When I got to the location I had found out there were STACKS of windows. So I did when any junk collector would have done.... FILLED my car! Yes, I literally stuffed it to the point of not being able to see out of any window other than... well, my windshield of course!

I believe it was Pinterst that had sparked my interest for this project and I can't wait to try each idea. I kept my first window pretty simple with just a little bit of chalkboard paint to see how it would work. I first had to sand, sand and sane some more! The picture shown above was actually the back of this project and the other side has layers of chipping paint and dirt. I then painted the white and then free handed the chalkboard paint (with several coats). The chain was a very cheap purchase from Home Depot. This was a quick and pretty simple project for those of you looking to dip into DIY!


The best part is that I still have a stack of windows to play with. I can alter colors and styles. There are ENDLESS possibities for customizing these windows. I added a few of my favorites (from Pinterest) that I will be sure to dabble in soon! Be sure to come back to check out the rest of them!
 
 
Window chalkboard
Repurposed Crafts | Repurposed Old Windows | Craft IdeasVintage decorating ideas
Perfect View

ORGANIZATION: Stackable Bins with a calkboard

BEFORE                                             AFTER
 
 
So these were a big score at a local tag sale one summer. I have this addiction to organization so knowing these would become great use at some point in the future I made the purchase (bargaining of course!). These stackable bins were once used as recycle bins but in my eyes, I saw nothing but organizing written all over them. They needed a good scrubbing and sanitizing (I'm a clean freak so this was a longer process than it sounds). After they were fully dried I started the spraying. I started with a base coat to help the spray paint adhere better to the plastic. Then I went to work with my favorite color Seaside by Rustoleum. These bins needed several coats and ample drying time so this was a time consuming step. But... in between coats I had time to run to the dollar store where I purchased (3) picture frames. I had several styles to choose from but considered the look I wanted. So these black and silver ones were the winners. Only needing the frame I took the picture frame apart and placed the glass and backing aside for a future project.
 
When the bins were completely covered and dried I used a protective coating on each since I expect quite wear and tear on these, especially on the insides. I do suggest some rubber mats (can be found at any home depot or even walmart) measured and placed at the bottoms of the inside for extra protection from rough storage such as toys.
 
BEFORE                                AFTER
 
 The next step was to make these frames into chalkboards to label each bin. I took out my scrap wood and using the paper inserts that came with the frames I measured the perfect size wood that would fit into the frame. After using my table jigsaw to cut each piece I primed each one (only painting the front). I then used several coats of black chalkboard paint on each. A little wood glue attached the wood and the frame together when fully dried and then my favorite, Gorilla Glue was used to attach the complete frame to the bins. The chalkboard was a great idea so you know exactly what was stored inside each bin but can be moved to different rooms and relabeled! Although I prefer these bins stacked vertically they can also be placed side by side horizontally to fit under furniture. ALTHOUGH ... If I had young kids I would use these to go under a bench in the hallway to the front door. Each would be labeled with a name and all their backpacks and/or shoes can be hidden! (always thinking ahead!!)
 
These bins are great for ANY room! For those of you who might like a few ideas: 
Kitchen- potatoes and onions, kids snacks
Kids /Baby's room- toys and coloring books, diapers
Bathroom- towels, blow dryer/curling iron
Craft Room- Endless uses!
 
 and the list can go on and on... So do you see why I am so obsessed with organization!?!


Tuesday, December 17, 2013

Everyone needs a Bar


With all the crazy holiday shopping, cooking, wrapping, sending out cards, more shopping and more wrapping I'm already exhausted! I was way over due for some *ME* time. I'm sure I spend my "me time" a little different than  most. As much as I love relaxing in a bubble bath I love creating even more. My me time was going to consist of creating something for my very own and NOT to sell! That doesn't happen very often or ... at all actually! I had this piece lying for years...


When I bought it from my neighbor many years ago I loved it. The style was unique and well... what woman doesn't love margaritas! With my kitchen being somewhat smaller than what I'd like I had to get creative because I wanted the bar and I also needed the space for prepping and cooking. This was the perfect piece for doing so. Knowing the uses for this bar I made sure the top was going to be durable and ready to withstand much use. With the kitchen being the first rooom you see when you enter my home I also want it to be stylish.

PROCESS: First like most pieces it needed a light sanding so that the paint would stick better and rid of the many stains on the top. After sanding wipe with a tack cloth to clear your surface. I used BEHR paint and primer in one. I have used this paint several times and was astonished when it worked quite well! (I'm used to using primer separately... you get to skip a step using this paint!) If I wasn't doing all this in my kitchen I would have loved to use a sprayer for this project. The paint got very tedious with the many divots and crevices. I did two coats and let it dry completely. Now for the top I bought this...


I've wanted to use this many times before but it's a bit pricey for me. Just under $30 for 1 box. Depending on how thick you'd like your coverage to be you may need more than one box. I like it to be pretty thick so this one box did it for my small coverage area. It comes with clear directions so follow them carefully. Just make sure when you pick the super glaze up you also purchase containers for mixing (measurements need to be on the containers), and also mixing sticks. All the required items needed I purchased at my local Home Depot Store (www.homedepot.com). Now the stylish design on the top is actually fabric. I measured the top and cut the fabric to fit. I sprayed the back of the fabric with adhesive so when I poured the glaze over the fabric it didn't move. F.Y.I the super glaze does have a very strong oder so I do reccomend that you use it in a well ventilated area. I used painters tape around the egdges so the glaze wouldn't drip....
 
 
And finally the complete project when everything was dry and ready for use ...  


Saturday, December 14, 2013

Room Make Over- An Office Transformation

So it's pretty much become a daily routine for me to find something around the house or even some room to redecorate (Yes, I’ve painted each room several times). I think that I get this from my dad. When I was young he would go from room to room redecorating and when he reached the last room he would just start over. Since this redecorating happens to often I'm on a VERY tight budget. I'm often finding ways to get stuff for FREE (tag sale leftovers, craigslist) and if it's not free well then it's pretty darn cheap (thrift stores). I'm a believer that anything can be recycled. When I moved my office from one room to another I decided that I wanted more vibrant colors incorporated with the room being smaller. So this is what I did...

       Key Lime Green!! It's such an invigorating color. It really does... somehow... help keep me motivated. These lamps were free from a friend who moved and wanted to trash them. They were once an ugly brown with even uglier off white marble shades. So all I did here was spray paint them! Rust-oleum is all I use for spray paint. The bases were done in metallic silver. The shades were a bit trickier because I had to stuff plastic bags on the insides and use painters tape to tape the edges so the paint didn't bleed on the inside. I used a Key Lime to spray the shades.
 
I live by the quote "Organization is Key" so I am constantly finding creative ways to organize EVERYTHING! So here we have a couple of accents vases. I use these for everything from a simple flower to spruce up the room (yes every now and then my boyfriend surprises me, but it has reverted to more of a then so I don't mind replacing real flower with fake one ;) to the obvious pens pencils and other office supplies. These were a great way to add color and not take up too much space.


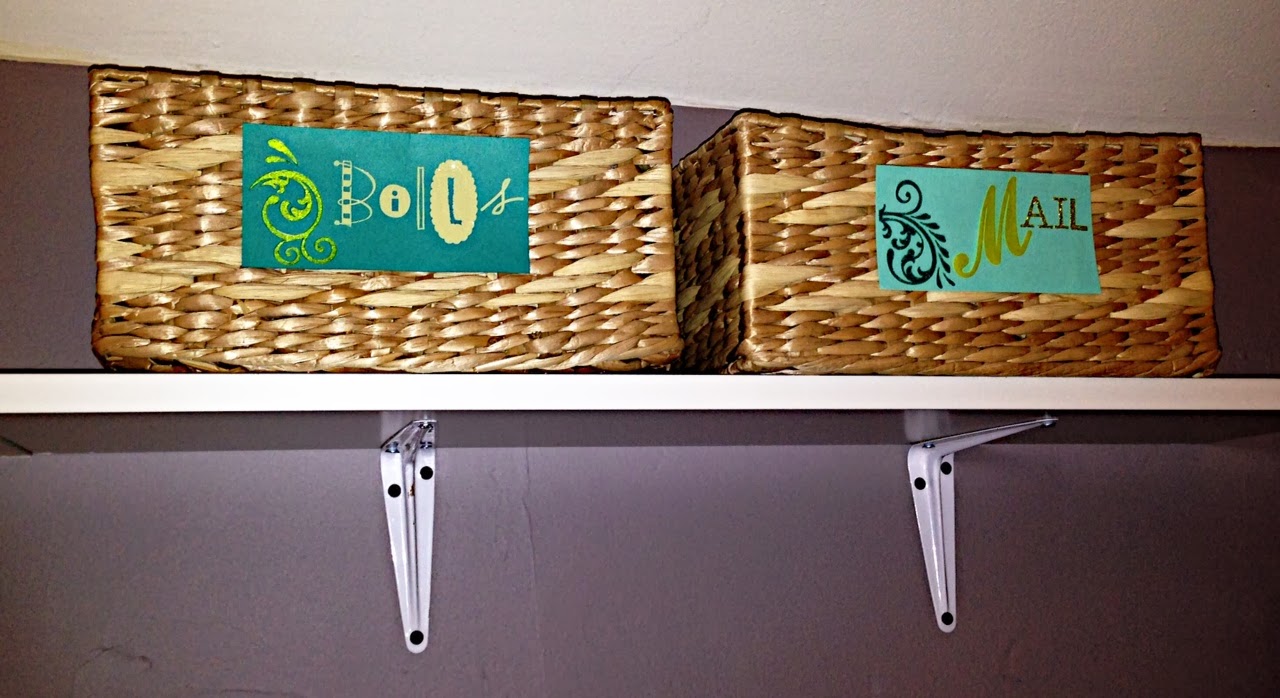
Once again, back to the organization! I get a lot of both of these ^Bills ^ and ^Mail^ .. unfortunately. So to make my life easier I found the most convenient way to keep up with both. I also have a few more baskets for other business related paperwork and receipts. The baskets were from Joann’s and were a whopping 80% off! I customized them using scrapbooking materials and hot glued them on. You can get scrapbooking supplies at any craft store. I'm a fan of A.C Moore because I'll print a coupon for 50% off any regular priced item and just make frequent trips. It totally pays off!


I'm a corkboard hoarder. I use them at home and work so when I find one I don't let it go. There are so many ways to customize your corkboard. You can get fancy using anything from ribbons to fabric or stay simple and just use paint. I needed this one done pretty fast so I'm guilty of not giving my ultimate perfection here (as you can probably see). All this entire project needed was the three variety of colors and some painters tape. It’s the drying time that had me tapping my nails.  
 
And last we have these candle holders. I added these to the room for a more cozy and homely feel. I bought these on clearance at a store closing. They were more of a bronze and although I didn't mind the color it just wouldn't match with my new theme. So using the same metallic spray paint I updated the look. Candles are pretty cheap in a variety of stores so just keep your eyes peeled!


Thursday, December 5, 2013

Easy Accent Jars

I am always looking for fast, easy, cheap (did I say cheap!) projects to help stage my larger pieces of furniture. Adding accent pieces can help others see an item in a way they wouldn’t have otherwise viewed it. And to me… the cheaper the better! So a great way to add some color would be these Bright Accent Jars. I save EVERY glass jar from the spaghetti sauce jar to the Starbucks Ice Coffee (saves my day) and even down to the small salsa jars. Variety is always better to me and you never know what you'll need it for!

 
This project is very simple. First you can sprits the glass bottles with a primer (for glass), RUSTOLEUM is my recommendation. Let dry. Drying time is important in between all coats for a smooth finish. Believe me! I’ve been in a rush many a times and was left with some unexpected surprises. Choose your colors. To me the brighter … the better. So I chose Rust-Oleum American Accents Ultra Cover 2X seaside, key lime, and real orange. Spray each bottle and don’t forget the inside (top only). You can spruce the jar up a bit using a simple clamp ($1.30 at hardware stores). I spray the clamps with the same three colors and and switched them up so they would pop. Some jars will come with added flare already but others (like my spaghetti jars) are quite plain. To add some quick detail I took a hot glue gun and wrote the famous words… *LIVE* LAUGH* and *LOVE* (before spray painting). There are many ways to spruce up any jars lying around the house so don't be afraid to play with some ideas!
 
And WALA! They are great for a variety of uses and add some pop of color! ENJOY!